
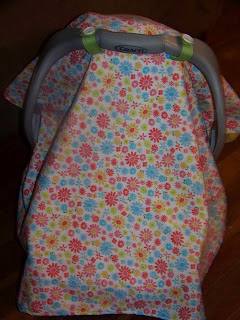
When my boys were babies, I was always trying to drape a recieving blanket over their infant carrier car seat to keep the sun off of them, but it seems like it was always falling off. With the new baby coming, I thought it would be nice to have a cover that is lightwight and breathable, yet keeps baby covered, and doesn't fall off. So, this is what I came up with.
I would love to see a picture if you make one.
**This tutorial is for personal and gifting use, please don't sell any covers that you make.**
You will need:
1 yard each of two coordinating fabrics
24 inches ribbon
Velcro
2 Buttons

1. Fold the fabric so that all four corners are lined up. Then, use a circle template to trace a rounded corner and cut all four layers. Repeat with the other fabric.

2. Pin the two fabrics right sides together and sew all around the edges, remembering to leave a gap to turn right side out.

3. Turn the fabric right side out and press.


4. Topstitch around the entire piece, being sure to sew the opening shut.
5. Take a 12" piece of ribbon and fold in half, right sides facing out. Topstitch around all sides. Attatch small Velcro pieces to ends, lining them up so that they will form a circle with the ribbon when shut. You may need to adjust the length of the ribbon, according to the size of your carseat's handle.

6. Fold the cover so that all four corners are lined up. Measure 3 inches in from the center of the fabric and mark both sides with a pin. This is where you will attach the ribbons.

7. Sew the ribbons onto the cover by sewing a small rectangle in the middle of each ribbon.

8. Sew a button on the outside of each ribbon, where the Velcro is attached.
Enjoy your new Summertime car seat cover!


 Iron interfacing onto the lining pieces.
  Take the two larger rectangles and measure up 11" from the bottom. Mark this spot and measure 1 1/2" from the sides. Mark this point.
 Cut the fabric along the line you just created, so that your fabric looks like this.
  Pin and sew these two pieces right sides together. I find it easier to have the heavier weight fabric (with interfacing) on bottom when sewing them together.
  Remember to leave an opening at the bottom to turn it right side out!
  Next, pin and sew the small rectangles together in the same way: right sides together, leaving an opening at the bottom. Clip corners.
  Turn right side out and press, being sure to fold the raw edges from the openings in.
  You now have your front and back pieces. Pin and sew these together with the outside fabric touching. You're just going to sew down both sides and across the bottom. When you sew the bottom, remember to catch the raw edges. It's a good idea to reinforce your stitches at the top on both sides. Measure in 1 1/2" from each bottom corner and cut this 1 1/2" square out.
  This next step can get a little confusing, but you can handle it! :)
  This should create a line where all the raw edges match up. Pin together. Make sure your seams are going in the same direction so that it will lay nicely. Repeat this on the other side.
  Sew along the raw edges.
 I sew this seam twice to make sure it's sturdy. This is what it should look like:
 Turn right side out. You're almost done!
  Pin the
 If you have any questions, please feel free to ask. If you make your own Diaper & Wipe Pocket, please send me a picture. I love getting to see other's projects!


 A dozen


